Friday, April 30, 2010

How to Make a Toddler Belt

This project was really seriously the easiest craft project that I've done in quite some time.  It's almost not even blog worthy....  But to step back for a minute, I figured why not share it.  It might inspire someone else to make their kid a belt.  OR maybe even make one for yourself (which btw is on my list of things to do).

How to make a Toddler Belt.  I purchased 1 yard of belt material from Joann's.  This particular print features turtles!  They had a few other prints, cute fish and something pink and of course the nostalgic rainbow flavor that it seems we all had as kids in the late 70's/early 80's! 

So with two little guys in the house, I decided 1 yard of belting and 1 pack of D rings (they come 4 in a pack) would be sufficient.  To make the belts I cut the yard in half, rolled one end and stitched it down.  placed the D rings on the other end, folded the end under and machine stitched it down.  Seriously folks, each belt was made in under 2 minutes. 

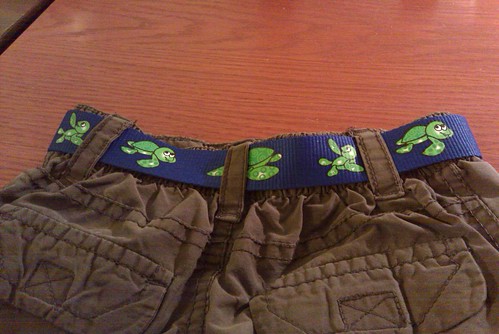
Both kids like them.  I will admit they are a little difficult for the boys to use and we had one bathroom accident occur because of the belt.  They do in fact hold up their pants so I'm happy about that!  And they love the little swimming turtles - you can see in this photo one of them is doing the back stroke - which just cracks me up!

As for future use of this project.  "I" happen to need a belt too.  I however do not need rainbows and turtles in my wardrobe so I'm planning on purchasing some plain cotton webbing and enough ribbon to stitch onto side one and up the tail end (inside) by about 6-8 inches.  So that when the belt is on the inside part of the tail that folds over and is now exposed has some fancy ribbon on it too.  Look for photos of that project in a few weeks.

Do you have a diy project to share? Share it at A Soft Place to Land to win!

Tuesday, April 6, 2010

How to Make a Rain Barrel

Making your own rain barrel is super easy!  I'm going to share with you how to make one.  You'll need a few items from the hardware store including a spigot and some plumbers putty/glue or tape, a gutter downspout diverter, a barrel, a drill with an inch width bit, two people, and an hour or so.

We have found the best place to find barrels is on craigslist.com.  Do a local search for "rain barrel" or "water barrel" You'll find a few suppliers in the Jeanette area with pretty fair prices.  We bought both of ours for $12 each, they met us in Greentree for the exchange.  If you're local to Pittsburgh, you could try calling Delallo's on rt 30. 

You'll also need one of these:

http://www.gardeners.com/Downspout-Diverter/33-991,default,pd.html - this is the downspout converter.  It attaches right here where the downspout curves to the right, that bendy downspout part comes off and is replaced with the diverter:

The bottom of the diverter sits in the bottom portion of the downspout, it connects to the top part of the downspout and a hose connects the whole thing to the center of the barrel lid, it feeds water right into the small hole in the top, once the barrel is full and the water starts to back up into the downspout, it automatically bypasses the barrel and drains down through the downspout like usual. There are a few different kinds of diverters, we prefer the one I linked to above.

As for the spigot installation, you'll need a basic spigot that looks like this:


(the water is draining out of this one because I had just moved it to take its photo)

Drill a hole that is just about the width of the spigot, I think ours was an inch, and I'm fairly certain this is an industry standard size, you'll have to make sure though as you'll want the spigot to screw into the plastic barrel and be quite snug.  Once you drill the whole and screw in the spigot, you'll have to get INTO the barrel, to snug it up and to put plumbers putty/glue or tape around there to seal it.  That's where the TWO people come into play, one of you will have to hold the barrel in place, while the other wiggles into the barrel.  I would also suggest, that if you're the barrel holder, laughing at your partner while they struggle to get into an olive barrel and NOT roll away is not appropriate until after they are OUT of the barrel!  I speak from experience!


This is what our barrels look like:


I hope this all makes sense!  It's quite an easy project and it's very fulfilling.  Nothing like watering your garden with free water right?  Please feel free to ask me any questions about the process!  I'm happy to help.

Saturday, April 3, 2010

Favorite Foto Friday #5 - Silly

I'm late, it was favorite foto friday and I missed it....  busy busy week and lots going on on Friday... here's my submission.  That's max in the photo with my husband, Chris @startpointmedia, Max was about 2 weeks old... oh my gosh....

Don't forget to visit Annie's Blog and add your own Favorite Foto Friday link to the MckLinky. 

Thursday, April 1, 2010

Public Speaking Gig(s): Stepping Outside of My Comfort Zone (and LOVING IT)

Last night I did something for the first time, I was asked to speak to the Pittsburgh chapter of American Society of Media Photographers (ASMP) about social media.  Strengthening Your Brand by Continuing the Conversation, was the topic of our conversation. 

Let's say I was a little nervous, I don't do a lot of public speaking and it has always been something that I wasn't fully comfortable doing.  I prepped and prepped for this talk and frankly felt pretty prepared (which admittedly was a new feeling for me LOL) I even had a few slides prepared with links to all of our favorite social media sites to help illustrate my talk.  The group size was between 15-20 folks and included a good mix of newer vs seasoned members.  This directly correlated with their previous social media knowledge. 

I discussed how to integrate Facebook Fan Pages, Twitter and blogs into current routines and explained the strength of the social media conversation explaining how it will eventually lead to the goal of increasing sales, a topic that is very familiar to all small business owners.

The group was welcoming and engaging, they all asked great questions which helped tremendously.  I also agreed to be recorded during my talk, two hour-long tapes later, I've now got raw footage and audio of my presentation which may or may not make it to my blog eventually.  (Who and I kidding!  It probably will - I just need to decide if it will be the full video or just the audio... maybe both....) I am also certain that my audio/video will be shared via ASMP and their social media outlets.

My comfort zone has now been expanded!  I had such an enjoyable time talking to a group of folks who were eager to learn about something that I know quite a bit about.  It was a very new feeling and one that I enjoyed!  Can't wait to do this again.